
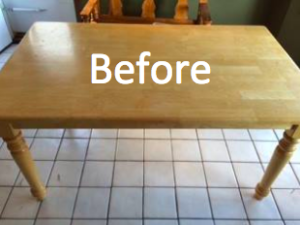
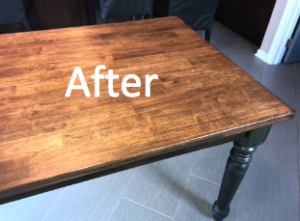
So many of us have the light oak farm table and chairs in our kitchens. Mine had been an everyday table with three kids and while it held up, the surface had paint, marker, egg dye on it – tell tale signs of a well loved and used surface. When we remodeled our kitchen in beige, black and neutral grays, my husband wanted to buy a new table. But I prefer to reuse things (and save money) so I decided to make it into a more modern table that would fit our new look. The entire process took me two weeks (as I was working on it around my full time job, kids’ activities, etc.; and each coat of polyurethane needs time to dry) but in the end I was very happy with how it came out. For my table I stained the top and painted the legs. It’s been two years now and the table surface has held up wonderfully! The hardest step is the polyurethane – you just need a lot of patience. But it’s necessary if you want a flawless finish that will hold up to everyday use. Here are the materials I used and the steps I took to repurpose and modernize an old farm table. If I can do it, you can too – give my technique a try with any table!
Materials:
- Palm sander with heavy weight sandpaper
- Light sandpaper
- Wood stain
- Oil-based polyurethane
- Mineral spirits
- Chalk paint
- Furniture wax
- Quality brushes (I use Purdy brushes, available at Amazon, Home Depot, etc.). These won’t lose bristles in your work surface. There’s nothing worse than finding a bristle in your finished product!
Steps:
- Square off the round corners. Literally, just saw off those rounded corners. I used a table saw. This instantly updated the table. If you don’t have a saw and/or want to skip this step, no problem! You can still alter the corners in the next step.
- Remove the current varnish from the table. I never use chemicals to remove finishes. Just a palm sander with heavy duty sandpaper and it came right off. If you press too hard with a palm sander you can really wear down the wood and even nick it. I did this on the corners to give the table a more worn look.
- Stain the table top with furniture stain. I wanted the table top to be “weathered gray,” but when I used this color it came out too blue looking. I put on a second coat of gray to darken it and really get it in the ridges and worn areas of the table top. I then lightly sanded it to remove some of the surface gray and threw on a coat of dark brown (java) stain. I liked the brown over the gray – it covered the blue hue and darkened the gray even more. Stain is quick and easy to throw on and it dries fast – just play with the colors until you get one you like. You can always sand it off if you hate it!
- Protect the surface with polyurethane. I used oil-based (as opposed to water-based) because it protects better and this is a heavily used surface. It does take longer to dry in between coats though, and has more odor. With water-based you need more coats to get the added protection. Even though I used the oil-based, I still put on five coats total to make sure the table top was well protected. TIP: thin the polyurethane with mineral spirits. I did 3:1 polyurethane to mineral spirits. This helps the polyurethane go on smoother. The tricky part with polyurethane is it easily gets air bubbles in it. You need to apply it slowly, and lightly sand in between coats to remove any air bubbles. Then on your last coat go extra slow to avoid air bubbles! Thinning with mineral spirits helps cut down on air bubbles too.
- Paint the table legs. I used Annie Sloan chalk paint which literally requires no prep work (other than wiping down any surface dirt). I also like Amy Howard at Home brand of paint (available at Ace Hardware) but I do not like her wax (it’s not a soft wax and i find it hard to distribute). The paint color I used was Graphite. After two coats of paint, I used Annie Sloan dark wax to protect the paint.
And that’s it! The table originally had matching oak chairs. We replaced the chairs with these black chairs from Ikea (as seen in the image at the top).
Comments